How to Hang Pots, Pans, and Other Kitchen Tools on the Wall: Tight Living Space Solutions
Some of the world’s greatest chefs haven’t been discovered yet—they live in 700 square foot apartments in Los Angeles or a three-story walkup in Queens. They dish out some of the best fare for family and friends. Naturally, these same people struggle each time they get ready to prepare one of their signature recipes because they can’t find the pots, pans, and other kitchen utensils they need. When you live in a congested apartment or you have a kitchen lacking in cabinet space, finding homes for all these pans, skillets, graters, peelers, eggbeaters, (and let us not forget the wine bottle opener) cooking can quickly go from cloud nine to hellacious endeavor.
Well, family cook in cramped quarters, your kitchen organizing nightmare ends right here, right now! Who would ever have thought all you would need are pegboard, some hooks, and a piece of chalk? Read on and learn how to get your eggs in one basket in the most space saving manner ever thought up by (wo)man!
First, get everything you think needs a visible home out on the kitchen table. Now, to be fair, this isn’t going to solve the issue of where to put your five colossal tamale pots (we can cover that another time, and by the way, we want some of those tamales). But even for your heaviest cast iron skillets, this will work when done correctly. And by correctly, we mean by using the YOUHANGIT wall hanging system, and as (almost) always, you will need screw anchors. This is not to suggest you will need to go into stud finder mode or use a loadbearing wall—just another beautiful plus of using YOUHANGIT and our Sexy Metal Hooks!
Once you have all the kitchen tools out on a table, you can determine about how large your pegboard will need to be. Of course, it has to be high up enough on the wall that meddlesome junior cooks-to-be can’t reach the heavy or dangerous items, so if you have to go wider rather than longer when measuring for your pegboard, that will work just fine. If you plan to add more and more tools as you go, pick a measurement that will accommodate a growing collection (who can really call themselves a cook without a garlic press, avocado slicer, and s’mores grill basket?)
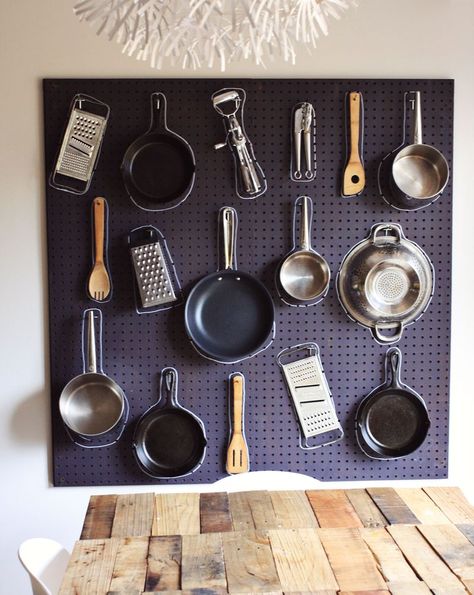
Once you get your pegboard measured and cut at the local hardware store, pick up a can of Rust-Oleum Chalkboard Spray—this is what will make your pegboard chalk-markable. Set your pegboard against a wall at a slant with cardboard or an old sheet behind it unless you just don’t care about that wall. Spray it down with the Rust-Oleum flat black spray and allow to dry completely.
Next, you’re going to bring the pegboard to the wall where you want to hang it with your YOUHANGIT Designer Kit in tow. Adhere a YOUHANGIT to either side of the top back of the pegboard, then set the handsfree YOULEVEL at top center. Now you are ready to squish your pegboard into the wall to make perfect marks for installing hardware to hang this bad boy. Pull away, install your screw anchors, then screw your pegboard to the wall. Here’s where those Sexy Metal Hooks are going to come in handy: The pegboard itself will not bear the weight of the heavier objects, you once you have made your chalk outlines of each item to be hung, tap a Sexy Metal Hook into the pegboard (ensuring it goes through the wall as well). These hooks can handle 10, 20, 30, 50, and even 100-pound items, so use the hooks from your Designer Kit accordingly (i.e., don’t use the 100-pound hook for your ladle).
Hang your pots, pans, and other kitchen tools within their allotted chalk outlines on the appropriate Sexy Metal Hook and oula, space is saved and you can actually see what you need to make dinner!
PRO TIP: If the Sexy Metal Hook is not large enough to accommodate the eyelet of a given pot, pan, etc., simply hang an S-hook from the Sexy Metal Hook that will accommodate the item’s loophole. Now you’re cookin’ with gas!