Getting Crafty: How to Create the Perfect Craft Room (AKA "The Reverse Mancave")
Organize your crafting space with shelves and other wall-hanging devices.
When it comes to the crafting crowd, going halfway is never part of the equation. We're talking about people who create elaborate quilts, scrapbooks, and make clothes for their whole families. Crafting, my friends, is not for the meek.
In order to craft well and stay on point while working on any variety of projects, organization is the key. Any crafter worth their salt can tell you: you’re going to need a place to store ribbons, decals, needles, markers, scraps of materials, paints, and whatever else you use to do what you do. When it comes to your crafting room, you have to think to yourself, “What Would Martha Stuart Do?” When you know the answer to this question, you have snatched the pebble from the master, my child.
How to hang shelves to organize your craft room
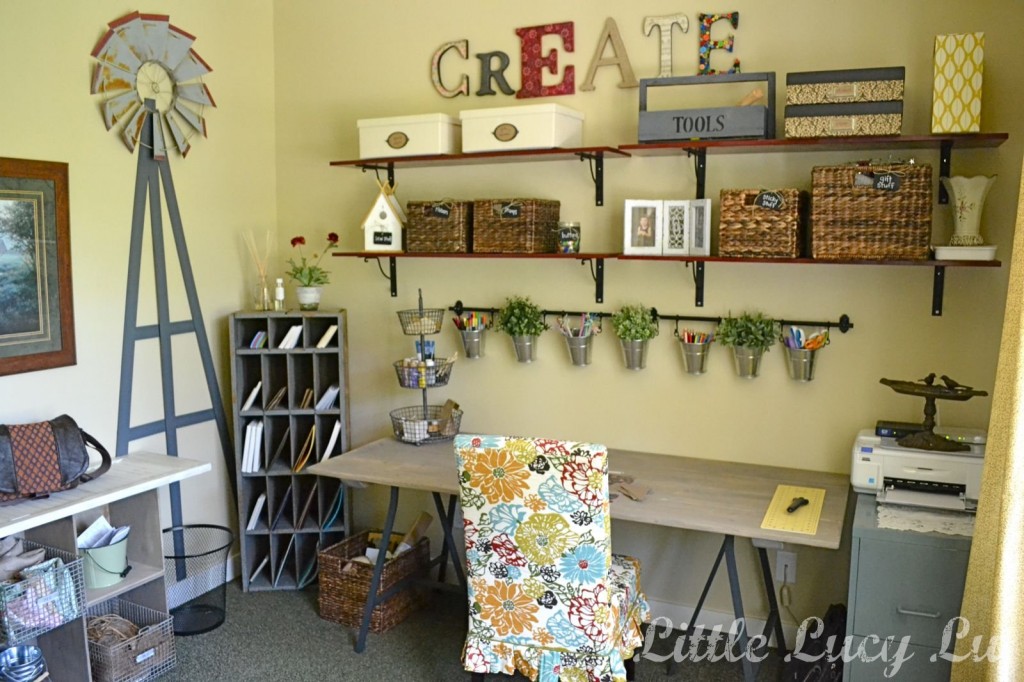
When it comes to making the most of the space you have to work with, shelves are absolutely the go-to answer for saving space. Use shelves for your collection of yet-to-be-used scrapbooks, binders full of stickers and cut-outs, and larger items like matte board cutters and paper trimmers, and even portable sewing machines that don’t have a permanent home on a table. The heavier the items, the lower and wider the shelves should be. Using YOUHANGIT to create the perfect marks for your shelf brackets by placing a YOUHANGIT device on the back of the shelf over top the keyhole on either side. Peel away the paper to reveal the sticky part of each YOUHANGIT and remove the red safety plug. Place the YOULEVEL on the center top of the shelf and move toward the spot on the wall where you want your shelf to hang. When the bubble inside the YOULEVEL is in the center, squish the shelf with the YOUHANGITs secured to the back against the wall to make perfectly level marks for your hardware.

Perfect way to store the essentials of the craft room: pegboard + J-hooks
Pegboard is pure genius in the crafting room. It allows you to neatly arrange all manner of tools in the order that best suits you and puts them in your reach while taking things like everyday scissors and specialty sheers out of the reach of little ones. What’s more, when using J-hooks or other types of hooks for pegboards, you can display and hang all kinds of other goodies on the wall and out of the way in a manner that shelves really aren’t great for. Things like vials of glitter, hole punchers, stamps, and spools of ribbon, thread, and twine can all be hung from pegboard. You can easily hang a pegboard in your craft room using two YOUHANGITs adhered to the back and by fastening the YOULEVEL to the front center of the pegboard with a simple piece of easily removable double-sided tape. Once this is done, you can hang the pegboard using two of our heavy duty Sexy Metal Hooks appropriate for 30 pounds or even 50 pounds each — simply apply the Sexy Metal Hooks onto the wall where your marks were made and slip the hooks through holes in the pegboard. If your pegboard alone weighs more than 30 pounds, you may want to consider breaking it up into two pieces for ease of use and for better safety.
How to use a curtain rod and adorable lil’ buckets to organize pens and more
Curtain rods are so versatile, yet so few people know it or use them for unconventional projects. By hanging a curtain rod on the wall in your craft room at eye level, you’ve just given yourself the ideal place to hang adorable lil’ buckets to hold all manner of crafting goodies from calligraphy pens to glitter pens, large knitting or crochet needles, or even as mini planters to brighten up the room with some foliage. Adding a curtain rod to the wall is a snap. First, you’ll apply the YOULEVEL to the curtain rod by using the bands that come with it in the package — simply hold the handsfree level to the bar and wrap a band around either side to hold it in place right in the middle of the curtain rod. Once you’ve done this (assuming you’re using a small curtain rod that is connected to the hardware that fastens it to the wall) you’ll simply remove the backing from two YOUHANGITs, and apply them to either end of the curtain rod where the hardware backing is. Simply walk toward your desired location for the curtain rod, wait for the bubble in the blue liquid to center, and squish that sucker against the wall.
Now you have all the makings of the perfect craft room! We helped you make the place where you’ll make stuff, so we want to see what you make! Send us photos of your home-crafted goodies to support@yhibliss.com and we’ll show you off on our Instagram page!